Friday, December 23, 2011
Workflow Locked
Recently, I had Workflow Designer crash on me, and when I tried to re-open the workflow, I got this error message:
Workflow Designer
The process is locked can cannot be saved under the same name. Open the process?
Because my session crashed, the lock was not released. I couldn't find a proper way to release the lock, but the following procedure worked for me to unlock the workflow. Use at your own risk!
On the Service Connect server, I stopped and restarted this service:
ScaLockSrv - Allows users to work simultaneously with shared data.
Thursday, October 27, 2011
What is the Epicor ICE SDK?
A couple people have asked me if I know what the Epicor ICE SDK (aka. Vantage SDK) is.
Here is all I know about the Software Developer's Kit:
If anyone has any experience with it, please comment below, or, if you have something more to say, I can post an entry for you.
Here is all I know about the Software Developer's Kit:
- It allows you to customize the Epicor itself by adding new tables, business objects, and forms.
- It seems to be geared more for developing features which run inside of Epicor, as opposed to integrating Epicor with other systems.
- There is no trial version to try before you buy.
- The best place to find out more is to ask your sales rep. He or she should be able to email you some PDFs regarding the capabilities.
- It's not cheap.
If anyone has any experience with it, please comment below, or, if you have something more to say, I can post an entry for you.
Tuesday, September 27, 2011
Set ReportParam in Epicor Customization
In Epicor, I needed to customize the Sales Order Pick List report screen so it defaults to a wider From and To Ship By date range. In customization, this means updating the ReportParam value when the form loads:
Normally, to access the text field for a control in a customization you use csm.GetNativeControlReference. But, in this case, I needed to change the ReportParam, which is accessed through oTrans.EpiDataViews["ReportParam"] dataset.
private void SOPickListForm_Load(object sender, EventArgs args)
{
// wrong approach, change data source of control
// EpiTokenDate tdtFrom = (EpiTokenDate) csm.GetNativeControlReference("1f043839-c70e-41e0-8d1b-c33fd3d7e3c5");

// change from date
EpiDataView epiDataView = (EpiDataView) oTrans.EpiDataViews["ReportParam"];
epiDataView.dataView[epiDataView.Row]["FromDate"] = DateTime.Now.AddMonths(-6);
}
Normally, to access the text field for a control in a customization you use csm.GetNativeControlReference. But, in this case, I needed to change the ReportParam, which is accessed through oTrans.EpiDataViews["ReportParam"] dataset.
Friday, September 23, 2011
Get Results of Epicor BAQ as DataSet in C#
One of the easiest, and fastest ways to get data out of Epicor is to use C# and the Epicor client library assemblies. This article provides sample code to export the results of a business activity query created using the BAQ Designer into a C# .Net framework dataset.
Step 1 - Add References
In you project, at a minimum you will need to reference the following assemblies:
DynamicQuery is the business object to manage BAQs (it replaces QueryDesignDataSet in Vantage). BLConnectionPool & SessionMod are necessary to explicitly set the company for the session. This is important, because otherwise the company will be whatever company was last selected for the user account used to create the session, which can yield unpredictable results.
Step 2 - Add class to create business object
The following is my class to create Epicor business objects for me:
Step 3 - Add the call to your dynamic query
Above, I'm passing in an order number as the constant value to a criteria that already exists on the OrderHed table in the design of the query.
Step 1 - Add References
In you project, at a minimum you will need to reference the following assemblies:
-Epicor.Mfg.BO.DynamicQuery
-Epicor.Mfg.IF.IDynamicQuery
-Epicor.Mfg.Core.BLConnectionPool
-Epicor.Mfg.Lib.ISessionMod
-Epicor.Mfg.Lib.SessionMod
DynamicQuery is the business object to manage BAQs (it replaces QueryDesignDataSet in Vantage). BLConnectionPool & SessionMod are necessary to explicitly set the company for the session. This is important, because otherwise the company will be whatever company was last selected for the user account used to create the session, which can yield unpredictable results.
Step 2 - Add class to create business object
The following is my class to create Epicor business objects for me:
using System;
using System.Collections.Generic;
using System.Linq;
using System.Text;
using System.Configuration;

using Epicor.Mfg.Core;
using Epicor.Mfg.Proxy;
using Epicor.Mfg.BO;
using Epicor.Mfg.Lib;

namespace ExecuteDynamicQuery
{
public class BOFactory
{
private BLConnectionPool m_cnVantage = null;
private static string m_strKeyVantageServer = "VantageServer";
private static string m_strKeyVantagePort = "VantagePort";
private string company;
private string companyName;
private string plantID;
private string plantName;
private string workstationID;
private string workstationDescription;
private string employeeID;
private string countryGroupCode;
private string countryCode;

public BOFactory(string company)
{
this.company = company;
string user = ConfigurationSettings.AppSettings["UserName"];
string password = ConfigurationSettings.AppSettings["Password"];

m_cnVantage = new BLConnectionPool(user, password, "AppServerDC://"
+ ConfigurationSettings.AppSettings[m_strKeyVantageServer] + ":"
+ ConfigurationSettings.AppSettings[m_strKeyVantagePort]);

SetCompany(company);
}

///
/// Returns the DyanmicQuery object which manages BAQs
///
///
public Epicor.Mfg.BO.DynamicQuery GetDynamicQueryBO()
{
return new Epicor.Mfg.BO.DynamicQuery(m_cnVantage);
}

///
/// returns the session mod
///
///
public Epicor.Mfg.Lib.SessionMod GetSessionMod()
{
SessionMod sessionMod = new SessionMod(m_cnVantage);
return sessionMod;
}

///
/// changes the company associated with the current session
///
///
public void SetCompany(string company)
{
this.company = company;
Epicor.Mfg.Lib.SessionMod sessionMod = GetSessionMod();

sessionMod.SetCompany(company,
out companyName, out plantID, out plantName, out workstationID, out workstationDescription,
out employeeID, out countryGroupCode, out countryCode);
}
}
}
Step 3 - Add the call to your dynamic query
using System;
using System.Collections.Generic;
using System.Linq;
using System.Text;
using System.Data;

namespace ExecuteDynamicQuery
{
 class Program
 {
  static void Main(string[] args)
  {
   string company = "12";
   string queryID = "12-MyQuery";
   string orderNum = "726250";

   BOFactory factory = new BOFactory(company);
   var dynamicQuery = factory.GetDynamicQueryBO();

   // get query
   var queryDesignDataSet = dynamicQuery.GetByID(queryID);

   // get only specific order
   // QueryWhereItem is a criteria on OrderHed table
   queryDesignDataSet.QueryWhereItem[0]["RValue"] = orderNum;

   // execute query
   DataSet ds = dynamicQuery.Execute(queryDesignDataSet);

   // print results
   for (int i = 0; i < ds.Tables[0].Columns.Count; i++ )
   {
    Console.Write(ds.Tables[0].Rows[0][i].ToString());
   }
  }
 }
}
Above, I'm passing in an order number as the constant value to a criteria that already exists on the OrderHed table in the design of the query.
Monday, July 18, 2011
Epicor Customizations and Personalizations
If a user has a personalization for an existing form in Epicor, and you create a new customization, as soon as you "deploy" the customization by linking it to the form in Menu Maintenance, the user's personalization will be ignored.
Personalizations are always based on either the default form, or a customization (referred to as the parent layer).
To hook the personalization to the new customization you must:
1. Export the personalization to an .xml file by either:
a) Using System Maintenance, Utilities, Customization Maintenance (sic)
b) As the user, open the personalization designer, and choose Export button.
2. Attach the new customization to the menu.
3. As the user, log into Epicor, open the form (customization should now be loaded), start personalization, and click Import button.
Note that the only way associate the personalization being importing to the new customization is to log in as the user. You can not do this from any other account.
That said, Epicor does not recommend re-importing personalizations under a different customization. Instead, they suggest the user should recreate the personalization, because moving the personalization to the new customization may yield unexpected results. This is because part of the user's personalization is not actually exported to the personalization xml file, but instead is saved locally on the user's computer (such as the location of certain grids).
Wednesday, June 8, 2011
Epicor Replication - Fully-Functional Database
Epicor Replication allows you to replicate one or more tables from Epicor into a seperate SQL database.
Because we use OpenEdge for our Epicor database, we use replication to first export the data to an SQL database, before we import into our data warehouse, or as a source for other applications.
When you select the replicated database, you have two choices, ad-hoc or fully-functional. An Ad-hoc database starts empty, and the replication server will create the table schemas only for the replicated tables. A fully-functional database has all tables, view, stored procedures, etc. predefined, and can act as a read-only database for the Epicor client (or so they say, I haven't tried).
However, there is another, undocumented difference. The tables created in an ad-hoc database are different than the tables predefined in the fully-functional database. Specifically, a Character01 field in an ad-hoc database automatically gets created as an NTEXT column. NTEXT columns can not be used in comparison operations, which can be very restricting.
The same table in a fully-functional database has a Character01 field defined as a VARCHAR, which is much more useful.
So, where do you get a copy of a fully-functional database create script?
In your Epicor installation, find your Epicor905 folder, and then go to Epicor905\db with install\newdb\Epicor90564.sql.
Wednesday, May 11, 2011
Delete Rows in Epicor DeleteById Alternative
Epicor DeleteById vs. Update (RowMod="D")
In my experience, deleting rows from Epicor through the business objects works differently between objects.
For some objects, you can call.DeleteById, such as PartService.DeleteById and the row will be removed from Epicor database.
For other objects,.DeleteById fails (CustShipService.DeleteByID, SaleOrder.DeletedById, ...) sending to you check the AppServer log file, which states something like: "No ttOrderHead record is available", "Error attempting to push run time paramters onto the stack.".
In these cases, try deleting using the Update/RowMod option.
Call.Update (different from MasterUpdate, UpdateExt, etc.) passing in the appropriate dataset. You don't need the entire dataset returned by .GetById. Just pass in the element which has the unique ID for the business objects, and in that element, set RowMod="D".
For SalesOrder, my Service Connect trace looks like this:
In my experience, deleting rows from Epicor through the business objects works differently between objects.
For some objects, you can call
For other objects,
In these cases, try deleting using the Update/RowMod option.
Call
For SalesOrder, my Service Connect trace looks like this:
<ext_UpdateRequest:UpdateRequest xmlns:ext_UpdateRequest="http://Epicor.com/SalesOrder/UpdateRequest">
<ext_UpdateRequest:loginOptions>EPIC03</ext_UpdateRequest:loginOptions>
<ext_UpdateRequest:ds>
<ext_UpdateRequest:OrderHed>
<ext_UpdateRequest:UpdExtSalesOrderDataSetTypeOrderHed>
<ext_UpdateRequest:OrderNum>2300091</ext_UpdateRequest:OrderNum>
<ext_UpdateRequest:RowMod>D</ext_UpdateRequest:RowMod>
</ext_UpdateRequest:UpdExtSalesOrderDataSetTypeOrderHed>
</ext_UpdateRequest:OrderHed>
</ext_UpdateRequest:ds>
</ext_UpdateRequest:UpdateRequest>
Friday, May 6, 2011
Service Connect Workflow Architecture Tips for Developers
I’ve recently started designing workflows for Epicor’s Service Connect. Previously I have used Microsoft DTS and SSIS. There is little information available on how to design the overall architecture for workflows. Here are the things I wish I knew when I started. Some knowledge of Service Connect is required before this will make any sense at all.
DTA and USR Elements
Inside the message envelope, the two elements you will use the most are the DTA and USR elements. Think of the data in DTA as parameters you need for the current step, and USR as the overall data you are processing. The structure of data in the DTA will change from step to step, depending on what operation you are performing. The structure of the data in USR does not change across the workflow, and is designed by you as either Process Variables, or Message Extensions. Process Variables are single value fields, and hold things like object IDs. Message Extensions are based on a .xsd schema, and hold datasets.
To maintain USR data across steps, you must map the USR section from input schema into the output schema. This link is usually automatically done for you when you create a new Conversion or Request step, but in some cases it must be manually done.
Suggested Architecture
For your workflow, you should create a Workflow Schema which serves two purposes:
1. It defines the initial DTA structure which will receive data from an Input Channel.
2. It will act as the intermediary schema between steps, making your workflow much more flexible.
In general my workflows look like:
1. Request Conversion from Workflow Schema toRequest.xsd
2. Web Method / .NET Call
3. Save Response Conversion fromResponse.xsd to Workflow Schema
4. Repeat 1-3 for next Web Method / .NET Call
In my Request Conversion, I move data from the USR section to the DTA section of the request.
In my Save Response Conversion, I move data from the DTA section of the response into the USR section (usually as a Message Extension based on theResponse.xsd.
This allows the easy insert or rearrangement of workflow items, as all conversions before a Web Method request take Workflow Schema as their input. It also makes it easier to maintain the data through the workflow, as I know it always comes from the USR section.
Other Tips
Don’t Pass Entire Dataset
Just because a business object methods takes a dataset, it does not mean you must pass the entire dataset.
For instance, SalesOrder.ChangePartMaster takes a SalesOrderDataSet, but you really only have to pass in OrderHed, OrderDtl, OrderRepComm, and TaxConnectStatus. Passing in the entire dataset is less efficient. How do you know what elements a method actually needs? Perform the operation through Epicor Client, and see what element it passes.
Methods Were Developed for Epicor Client, not General Programming
I think the methods exposed by Epicor were really developed first to support the Epicor Client. This means, the methods often expect certain data in the dataset to exist, even if it seems unnecessary to the current method you are calling. If you having trouble getting a method to work, trace the same method call in Epicor Client, and look for any previous calls which modify the dataset you are passing in. You may have to call them first.
DTA and USR Elements
Inside the message envelope, the two elements you will use the most are the DTA and USR elements. Think of the data in DTA as parameters you need for the current step, and USR as the overall data you are processing. The structure of data in the DTA will change from step to step, depending on what operation you are performing. The structure of the data in USR does not change across the workflow, and is designed by you as either Process Variables, or Message Extensions. Process Variables are single value fields, and hold things like object IDs. Message Extensions are based on a .xsd schema, and hold datasets.
To maintain USR data across steps, you must map the USR section from input schema into the output schema. This link is usually automatically done for you when you create a new Conversion or Request step, but in some cases it must be manually done.
Suggested Architecture
For your workflow, you should create a Workflow Schema which serves two purposes:
1. It defines the initial DTA structure which will receive data from an Input Channel.
2. It will act as the intermediary schema between steps, making your workflow much more flexible.
In general my workflows look like:
1. Request Conversion from Workflow Schema to
2. Web Method / .NET Call
3. Save Response Conversion from
4. Repeat 1-3 for next Web Method / .NET Call
In my Request Conversion, I move data from the USR section to the DTA section of the request.
In my Save Response Conversion, I move data from the DTA section of the response into the USR section (usually as a Message Extension based on the
This allows the easy insert or rearrangement of workflow items, as all conversions before a Web Method request take Workflow Schema as their input. It also makes it easier to maintain the data through the workflow, as I know it always comes from the USR section.
Other Tips
Don’t Pass Entire Dataset
Just because a business object methods takes a dataset, it does not mean you must pass the entire dataset.
For instance, SalesOrder.ChangePartMaster takes a SalesOrderDataSet, but you really only have to pass in OrderHed, OrderDtl, OrderRepComm, and TaxConnectStatus. Passing in the entire dataset is less efficient. How do you know what elements a method actually needs? Perform the operation through Epicor Client, and see what element it passes.
Methods Were Developed for Epicor Client, not General Programming
I think the methods exposed by Epicor were really developed first to support the Epicor Client. This means, the methods often expect certain data in the dataset to exist, even if it seems unnecessary to the current method you are calling. If you having trouble getting a method to work, trace the same method call in Epicor Client, and look for any previous calls which modify the dataset you are passing in. You may have to call them first.
Thursday, April 28, 2011
Service Connect Workflow Designer XML Mapper Shortcut
The following tip can save you a lot of time in the XML Mapping tool, which is part of Epicor's Service Connect Workflow Designer.
When designing a workflow for Service Connect, some of the business object datasets are very wide (a large number of elements). Service Connect's only option for modifying data is to use a Conversion workflow item, which applies an XSLT to the data.
Even if you want to only modify a single value, you are forced to map all other values using XML Mapper, to avoid data being lost. With wide datasets, dragging a connection between each element is laborious.
In the Conversion example below, I only want to update the Name element (using a literal), but want to keep all other values the same.
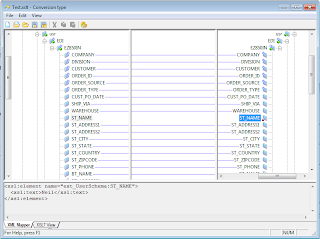
To automatically map elements to their previous values, hold down Ctrl key while dragging then connection between the parent ComplexType elements, then all child elements are automatically mapped. This can be a real time saver.
The help document explains it as:
"When mapping complex fields of multiple occurrence, the Mapper will not copy child elements automatically unless you hold the Ctrl button while dragging the linking line. You may also force the Mapper to copy all child fields by setting the Deep Copy flag in the Link Properties."
A word of caution however. There is not quick way to unmap the child elements. If you change your mind, you will have to manually select and delete each connection.
Tuesday, April 19, 2011
Epicor 905.602A "Invalid user ID or password."
We have been struggling awhile with the "Invalid user ID or password." issue with Epicor 905.602A.
Every one to two weeks, Epicor refuses to let us log in. The log files show nothing, and Management Console shows the app server running fine. However, if you stop and restart the app server, the problem goes away. Connecting using WCF instead of the Epicor Client returns the same error message.
On our last support call, Epicor Technical support has a possible solution. They believe the issue is with OpenEdge, not Epicor itself. We are running 64-bit OpenEdge on Windows.
To attempt to fix this issue, we are applying HotFix 21 (rl102ASP0321hf-64.EXE), available for download from the Epicor support site (you need an account to login). Because the problem occurs intermittently, I won't know for sure if the fix will work, but it is nice to have a course of action. Here's hoping.
Friday, April 15, 2011
Epicor Customizations and Menu Management
After you create a form customization for Epicor, you may want to set that customization as the default for all your users.
To do this, you use System Management > Utilities > Menu Maintanence to assign your customization to a menu item.
However, many menu items open the same form, and if you want the users to always use your customization, no matter which menu item they select, you manually find and change each menu item.
It is very easy to miss a menu item, and the users will not understand why the customizations does not appear.
I wrote a custom application, called Epicor Menu Manager, which uses Epicor's Web Services (using WCF) to make it easier to manage customizations.
It lets you:
Here's what it looks like:
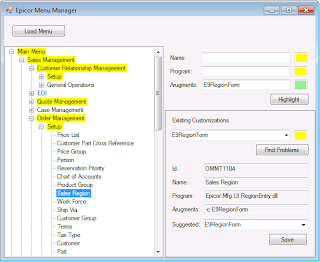
Above, I have asked to see all menu items eligible for my Sales Region customization. In the tree navigation, it hightlights the path to the found menu items.
I think this application might be userful for others. If you would like to buy a copy, please contact Summa-Tech.
To do this, you use System Management > Utilities > Menu Maintanence to assign your customization to a menu item.
However, many menu items open the same form, and if you want the users to always use your customization, no matter which menu item they select, you manually find and change each menu item.
It is very easy to miss a menu item, and the users will not understand why the customizations does not appear.
I wrote a custom application, called Epicor Menu Manager, which uses Epicor's Web Services (using WCF) to make it easier to manage customizations.
It lets you:
- search for menu items by name, program, or arguments
- find all menu items which are eligible, but not currently linked to a customization
- suggest and update customizations for a menu item
Here's what it looks like:

Above, I have asked to see all menu items eligible for my Sales Region customization. In the tree navigation, it hightlights the path to the found menu items.
I think this application might be userful for others. If you would like to buy a copy, please contact Summa-Tech.
Monday, April 11, 2011
Epicor 9 and User Defined Codes
When customizing Epicor 9, you might find you require additional fields for a given table.
For example, we have a client who organizes sales regions into sales districts. So, on the Sales Region Maintenance screen, we want the user to be able to select a district.
BEFORE

AFTER

You can customize the form, by adding a TextBox for SalesRegion.Character01 field, but it is better to have the user select from a range of choices.
Previously to accomplish this, you would have to add the sales districts into a user-defined table, and then add a combo box which populates from that table.
The easier way is to use something called User Defined Codes Maintenance.
Step 1 - Define User Codes
Located under System Management -> Utilities -> User Codes, open the "User Defined Codes Maintenance screen".
Create a Code Type, and then assign values (Code, and Code Description). In my case, I created a Code Type called "District", and added 4 codes, with descriptions "Northern District", "Southern District", etc. Each code also has a shorter Code ID.
Step 2 - Associate Field with User Code
Located under System Management -> Utilities -> Extended Properties, open the Extended Properties Maintenance screen.
In my case, I want to associate the district codes with the sales region:
Now the system knows that Region.Character01 is associated with User Defined Codes "District".
Step 3 - Form Customization
Now I need to add to the Sales Region form a combo box for the Character01 field.
As soon as I select Region.Character01 for the EpiBinding property, the system automatically filled in for me the EpiCombo properties.

And that's it. Now your users can choose from a pre-defined list of values for a user defined field.
For example, we have a client who organizes sales regions into sales districts. So, on the Sales Region Maintenance screen, we want the user to be able to select a district.
BEFORE

AFTER

You can customize the form, by adding a TextBox for SalesRegion.Character01 field, but it is better to have the user select from a range of choices.
Previously to accomplish this, you would have to add the sales districts into a user-defined table, and then add a combo box which populates from that table.
The easier way is to use something called User Defined Codes Maintenance.
Step 1 - Define User Codes
Located under System Management -> Utilities -> User Codes, open the "User Defined Codes Maintenance screen".
Create a Code Type, and then assign values (Code, and Code Description). In my case, I created a Code Type called "District", and added 4 codes, with descriptions "Northern District", "Southern District", etc. Each code also has a shorter Code ID.
Step 2 - Associate Field with User Code
Located under System Management -> Utilities -> Extended Properties, open the Extended Properties Maintenance screen.
In my case, I want to associate the district codes with the sales region:
- Selected "Region" DataSet Table ID
- Selected Fields tab, and selected the Character01 field from the tree view
- for the UD Code Type: field, chose "District" from combo box.
Now the system knows that Region.Character01 is associated with User Defined Codes "District".
Step 3 - Form Customization
Now I need to add to the Sales Region form a combo box for the Character01 field.
- Turn on Developer Mode (Main Menu -> Options -> Developer MOde)
- Open Sales Region
- Start Customization (Tools -> Customization)
- From Toolbox, add a EpiCombo control to the form
- Change the EpiBinding property to Region.Character01
As soon as I select Region.Character01 for the EpiBinding property, the system automatically filled in for me the EpiCombo properties.

And that's it. Now your users can choose from a pre-defined list of values for a user defined field.
Tuesday, March 29, 2011
What is DMT?

DMT stands for Data Management Tool.
Basically, it is a tool which allows the import of information into Epicor in the form of a text file.
We really only use DMT when first setting up a new Epicor implementation. The thing about DMT is, it is limited.
For some tables, you still must populate the data manually, or write custom code to populate it for you.
Here are some of the tables we populate using C# and .dll files in the Epicor Software/Client folder:
SalesRep, SalesTerritory, RefCategory, AnalysisCode
In you project, add references to:
- Epicor.Mfg.Common.BOExceptions
- Epicor.Mfg.Core.BLConnectionPool
- Epicor.MFG.Core.CallContext
- Epicor.Mfg.UI.EpiClientLib
- Epicor.Mfg.Lib.ISessionMod
- Epicor.Mfg.Lib.SessionMod
And then, for the business objects you want to use, add two references like this:
- Epicor.Mfg.BO.(business object name)
- Epcior.Mfg.IF.I(business object name)
Here is some sample code on how you can connect directly to Epicor:
  public BOFactory(string company)
  {
   this.company = company;
   string user = "manager";
   string password = "manager";

   m_cnVantage = new BLConnectionPool(user, password, "AppServerDC://"
 + ConfigurationSettings.AppSettings[m_strKeyVantageServer] + ":"
 + ConfigurationSettings.AppSettings[m_strKeyVantagePort]);
  }

  public Epicor.Mfg.BO.SalesTer GetSalesTerBO()
  {
   Epicor.Mfg.BO.SalesTer saleTer = new Epicor.Mfg.BO.SalesTer(m_cnVantage);
   return saleTer;
  }
And then, once you have your business object:
dataSet = new SalesTerDataSet();
salesTer.GetNewSalesTer(dataSet);
...
salesTer.Update(dataSet);
Also note that you can change the company you working with using this code:
  public void SetCompany(string company)
  {
   this.company = company;
   Epicor.Mfg.Lib.SessionMod sessionMod = new Epicor.Mfg.Lib.SessionMod(m_cnVantage);

   sessionMod.SetCompany(company,
    out companyName, out plantID, out plantName, out workstationID, out workstationDescription,
    out employeeID, out countryGroupCode, out countryCode);
  }
Thursday, March 17, 2011
Epicor Multi-Company Madness
Now, while I don't consider myself a genius, I feel reasonably intelligent enough to be able to accurately follow a setup installation guide.
However, when installation guide requires that you perform an action on page 75 to successfully get something on page 42 to work, something is seriously wrong.
Specifically, in Epicor's TechRefGuide_MultSite_905602.pdf, it asks you to "Test the Communication" by creating a new customer, marking them Global, save, and then:
"The Multi-Company Process transmits Customer and ShipTo records from that company and sends it to the other companies."
No, it doesn't. Skip to page 75, section "Link Global Records".
What the previous section should have said was:
1. Create the customer, mark as global, save.
2. Goto External Company Maintenance, and choose the child company, and choose Action -> Initialize Multi-Company...
3. Switch to child company, open Customer Maintenance, and choose Action, Link Customer...
4. Search for the customer you created in step once, and click Link.
Hopefully I have saved you the 2 days I wasted troubleshooting this issue.
Subscribe to:
Comments (Atom)
