Epicor Replication allows you to replicate one or more tables from Epicor into a seperate SQL database.
Because we use OpenEdge for our Epicor database, we use replication to first export the data to an SQL database, before we import into our data warehouse, or as a source for other applications.
When you select the replicated database, you have two choices, ad-hoc or fully-functional. An Ad-hoc database starts empty, and the replication server will create the table schemas only for the replicated tables. A fully-functional database has all tables, view, stored procedures, etc. predefined, and can act as a read-only database for the Epicor client (or so they say, I haven't tried).
However, there is another, undocumented difference. The tables created in an ad-hoc database are different than the tables predefined in the fully-functional database. Specifically, a Character01 field in an ad-hoc database automatically gets created as an NTEXT column. NTEXT columns can not be used in comparison operations, which can be very restricting.
The same table in a fully-functional database has a Character01 field defined as a VARCHAR, which is much more useful.
So, where do you get a copy of a fully-functional database create script?
In your Epicor installation, find your Epicor905 folder, and then go to Epicor905\db with install\newdb\Epicor90564.sql.
Wednesday, June 8, 2011


Wednesday, May 11, 2011
Delete Rows in Epicor DeleteById Alternative
Epicor DeleteById vs. Update (RowMod="D")
In my experience, deleting rows from Epicor through the business objects works differently between objects.
For some objects, you can call.DeleteById, such as PartService.DeleteById and the row will be removed from Epicor database.
For other objects,.DeleteById fails (CustShipService.DeleteByID, SaleOrder.DeletedById, ...) sending to you check the AppServer log file, which states something like: "No ttOrderHead record is available", "Error attempting to push run time paramters onto the stack.".
In these cases, try deleting using the Update/RowMod option.
Call.Update (different from MasterUpdate, UpdateExt, etc.) passing in the appropriate dataset. You don't need the entire dataset returned by .GetById. Just pass in the element which has the unique ID for the business objects, and in that element, set RowMod="D".
For SalesOrder, my Service Connect trace looks like this:
In my experience, deleting rows from Epicor through the business objects works differently between objects.
For some objects, you can call
For other objects,
In these cases, try deleting using the Update/RowMod option.
Call
For SalesOrder, my Service Connect trace looks like this:
<ext_UpdateRequest:UpdateRequest xmlns:ext_UpdateRequest="http://Epicor.com/SalesOrder/UpdateRequest">
<ext_UpdateRequest:loginOptions>EPIC03</ext_UpdateRequest:loginOptions>
<ext_UpdateRequest:ds>
<ext_UpdateRequest:OrderHed>
<ext_UpdateRequest:UpdExtSalesOrderDataSetTypeOrderHed>
<ext_UpdateRequest:OrderNum>2300091</ext_UpdateRequest:OrderNum>
<ext_UpdateRequest:RowMod>D</ext_UpdateRequest:RowMod>
</ext_UpdateRequest:UpdExtSalesOrderDataSetTypeOrderHed>
</ext_UpdateRequest:OrderHed>
</ext_UpdateRequest:ds>
</ext_UpdateRequest:UpdateRequest>
Friday, May 6, 2011
Service Connect Workflow Architecture Tips for Developers
I’ve recently started designing workflows for Epicor’s Service Connect. Previously I have used Microsoft DTS and SSIS. There is little information available on how to design the overall architecture for workflows. Here are the things I wish I knew when I started. Some knowledge of Service Connect is required before this will make any sense at all.
DTA and USR Elements
Inside the message envelope, the two elements you will use the most are the DTA and USR elements. Think of the data in DTA as parameters you need for the current step, and USR as the overall data you are processing. The structure of data in the DTA will change from step to step, depending on what operation you are performing. The structure of the data in USR does not change across the workflow, and is designed by you as either Process Variables, or Message Extensions. Process Variables are single value fields, and hold things like object IDs. Message Extensions are based on a .xsd schema, and hold datasets.
To maintain USR data across steps, you must map the USR section from input schema into the output schema. This link is usually automatically done for you when you create a new Conversion or Request step, but in some cases it must be manually done.
Suggested Architecture
For your workflow, you should create a Workflow Schema which serves two purposes:
1. It defines the initial DTA structure which will receive data from an Input Channel.
2. It will act as the intermediary schema between steps, making your workflow much more flexible.
In general my workflows look like:
1. Request Conversion from Workflow Schema toRequest.xsd
2. Web Method / .NET Call
3. Save Response Conversion fromResponse.xsd to Workflow Schema
4. Repeat 1-3 for next Web Method / .NET Call
In my Request Conversion, I move data from the USR section to the DTA section of the request.
In my Save Response Conversion, I move data from the DTA section of the response into the USR section (usually as a Message Extension based on theResponse.xsd.
This allows the easy insert or rearrangement of workflow items, as all conversions before a Web Method request take Workflow Schema as their input. It also makes it easier to maintain the data through the workflow, as I know it always comes from the USR section.
Other Tips
Don’t Pass Entire Dataset
Just because a business object methods takes a dataset, it does not mean you must pass the entire dataset.
For instance, SalesOrder.ChangePartMaster takes a SalesOrderDataSet, but you really only have to pass in OrderHed, OrderDtl, OrderRepComm, and TaxConnectStatus. Passing in the entire dataset is less efficient. How do you know what elements a method actually needs? Perform the operation through Epicor Client, and see what element it passes.
Methods Were Developed for Epicor Client, not General Programming
I think the methods exposed by Epicor were really developed first to support the Epicor Client. This means, the methods often expect certain data in the dataset to exist, even if it seems unnecessary to the current method you are calling. If you having trouble getting a method to work, trace the same method call in Epicor Client, and look for any previous calls which modify the dataset you are passing in. You may have to call them first.
DTA and USR Elements
Inside the message envelope, the two elements you will use the most are the DTA and USR elements. Think of the data in DTA as parameters you need for the current step, and USR as the overall data you are processing. The structure of data in the DTA will change from step to step, depending on what operation you are performing. The structure of the data in USR does not change across the workflow, and is designed by you as either Process Variables, or Message Extensions. Process Variables are single value fields, and hold things like object IDs. Message Extensions are based on a .xsd schema, and hold datasets.
To maintain USR data across steps, you must map the USR section from input schema into the output schema. This link is usually automatically done for you when you create a new Conversion or Request step, but in some cases it must be manually done.
Suggested Architecture
For your workflow, you should create a Workflow Schema which serves two purposes:
1. It defines the initial DTA structure which will receive data from an Input Channel.
2. It will act as the intermediary schema between steps, making your workflow much more flexible.
In general my workflows look like:
1. Request Conversion from Workflow Schema to
2. Web Method / .NET Call
3. Save Response Conversion from
4. Repeat 1-3 for next Web Method / .NET Call
In my Request Conversion, I move data from the USR section to the DTA section of the request.
In my Save Response Conversion, I move data from the DTA section of the response into the USR section (usually as a Message Extension based on the
This allows the easy insert or rearrangement of workflow items, as all conversions before a Web Method request take Workflow Schema as their input. It also makes it easier to maintain the data through the workflow, as I know it always comes from the USR section.
Other Tips
Don’t Pass Entire Dataset
Just because a business object methods takes a dataset, it does not mean you must pass the entire dataset.
For instance, SalesOrder.ChangePartMaster takes a SalesOrderDataSet, but you really only have to pass in OrderHed, OrderDtl, OrderRepComm, and TaxConnectStatus. Passing in the entire dataset is less efficient. How do you know what elements a method actually needs? Perform the operation through Epicor Client, and see what element it passes.
Methods Were Developed for Epicor Client, not General Programming
I think the methods exposed by Epicor were really developed first to support the Epicor Client. This means, the methods often expect certain data in the dataset to exist, even if it seems unnecessary to the current method you are calling. If you having trouble getting a method to work, trace the same method call in Epicor Client, and look for any previous calls which modify the dataset you are passing in. You may have to call them first.
Thursday, April 28, 2011
Service Connect Workflow Designer XML Mapper Shortcut
The following tip can save you a lot of time in the XML Mapping tool, which is part of Epicor's Service Connect Workflow Designer.
When designing a workflow for Service Connect, some of the business object datasets are very wide (a large number of elements). Service Connect's only option for modifying data is to use a Conversion workflow item, which applies an XSLT to the data.
Even if you want to only modify a single value, you are forced to map all other values using XML Mapper, to avoid data being lost. With wide datasets, dragging a connection between each element is laborious.
In the Conversion example below, I only want to update the Name element (using a literal), but want to keep all other values the same.
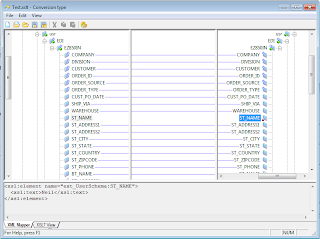
To automatically map elements to their previous values, hold down Ctrl key while dragging then connection between the parent ComplexType elements, then all child elements are automatically mapped. This can be a real time saver.
The help document explains it as:
"When mapping complex fields of multiple occurrence, the Mapper will not copy child elements automatically unless you hold the Ctrl button while dragging the linking line. You may also force the Mapper to copy all child fields by setting the Deep Copy flag in the Link Properties."
A word of caution however. There is not quick way to unmap the child elements. If you change your mind, you will have to manually select and delete each connection.
When designing a workflow for Service Connect, some of the business object datasets are very wide (a large number of elements). Service Connect's only option for modifying data is to use a Conversion workflow item, which applies an XSLT to the data.
Even if you want to only modify a single value, you are forced to map all other values using XML Mapper, to avoid data being lost. With wide datasets, dragging a connection between each element is laborious.
In the Conversion example below, I only want to update the Name element (using a literal), but want to keep all other values the same.

To automatically map elements to their previous values, hold down Ctrl key while dragging then connection between the parent ComplexType elements, then all child elements are automatically mapped. This can be a real time saver.
The help document explains it as:
"When mapping complex fields of multiple occurrence, the Mapper will not copy child elements automatically unless you hold the Ctrl button while dragging the linking line. You may also force the Mapper to copy all child fields by setting the Deep Copy flag in the Link Properties."
A word of caution however. There is not quick way to unmap the child elements. If you change your mind, you will have to manually select and delete each connection.
Tuesday, April 19, 2011
Epicor 905.602A "Invalid user ID or password."
We have been struggling awhile with the "Invalid user ID or password." issue with Epicor 905.602A.
Every one to two weeks, Epicor refuses to let us log in. The log files show nothing, and Management Console shows the app server running fine. However, if you stop and restart the app server, the problem goes away. Connecting using WCF instead of the Epicor Client returns the same error message.
On our last support call, Epicor Technical support has a possible solution. They believe the issue is with OpenEdge, not Epicor itself. We are running 64-bit OpenEdge on Windows.
To attempt to fix this issue, we are applying HotFix 21 (rl102ASP0321hf-64.EXE), available for download from the Epicor support site (you need an account to login). Because the problem occurs intermittently, I won't know for sure if the fix will work, but it is nice to have a course of action. Here's hoping.
Every one to two weeks, Epicor refuses to let us log in. The log files show nothing, and Management Console shows the app server running fine. However, if you stop and restart the app server, the problem goes away. Connecting using WCF instead of the Epicor Client returns the same error message.
On our last support call, Epicor Technical support has a possible solution. They believe the issue is with OpenEdge, not Epicor itself. We are running 64-bit OpenEdge on Windows.
To attempt to fix this issue, we are applying HotFix 21 (rl102ASP0321hf-64.EXE), available for download from the Epicor support site (you need an account to login). Because the problem occurs intermittently, I won't know for sure if the fix will work, but it is nice to have a course of action. Here's hoping.
Friday, April 15, 2011
Epicor Customizations and Menu Management
After you create a form customization for Epicor, you may want to set that customization as the default for all your users.
To do this, you use System Management > Utilities > Menu Maintanence to assign your customization to a menu item.
However, many menu items open the same form, and if you want the users to always use your customization, no matter which menu item they select, you manually find and change each menu item.
It is very easy to miss a menu item, and the users will not understand why the customizations does not appear.
I wrote a custom application, called Epicor Menu Manager, which uses Epicor's Web Services (using WCF) to make it easier to manage customizations.
It lets you:
Here's what it looks like:
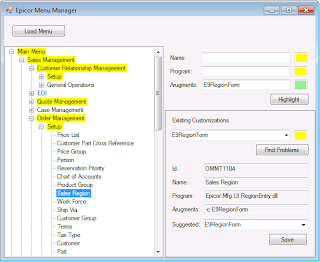
Above, I have asked to see all menu items eligible for my Sales Region customization. In the tree navigation, it hightlights the path to the found menu items.
I think this application might be userful for others. If you would like to buy a copy, please contact Summa-Tech.
To do this, you use System Management > Utilities > Menu Maintanence to assign your customization to a menu item.
However, many menu items open the same form, and if you want the users to always use your customization, no matter which menu item they select, you manually find and change each menu item.
It is very easy to miss a menu item, and the users will not understand why the customizations does not appear.
I wrote a custom application, called Epicor Menu Manager, which uses Epicor's Web Services (using WCF) to make it easier to manage customizations.
It lets you:
- search for menu items by name, program, or arguments
- find all menu items which are eligible, but not currently linked to a customization
- suggest and update customizations for a menu item
Here's what it looks like:

Above, I have asked to see all menu items eligible for my Sales Region customization. In the tree navigation, it hightlights the path to the found menu items.
I think this application might be userful for others. If you would like to buy a copy, please contact Summa-Tech.
Monday, April 11, 2011
Epicor 9 and User Defined Codes
When customizing Epicor 9, you might find you require additional fields for a given table.
For example, we have a client who organizes sales regions into sales districts. So, on the Sales Region Maintenance screen, we want the user to be able to select a district.
BEFORE

AFTER

You can customize the form, by adding a TextBox for SalesRegion.Character01 field, but it is better to have the user select from a range of choices.
Previously to accomplish this, you would have to add the sales districts into a user-defined table, and then add a combo box which populates from that table.
The easier way is to use something called User Defined Codes Maintenance.
Step 1 - Define User Codes
Located under System Management -> Utilities -> User Codes, open the "User Defined Codes Maintenance screen".
Create a Code Type, and then assign values (Code, and Code Description). In my case, I created a Code Type called "District", and added 4 codes, with descriptions "Northern District", "Southern District", etc. Each code also has a shorter Code ID.
Step 2 - Associate Field with User Code
Located under System Management -> Utilities -> Extended Properties, open the Extended Properties Maintenance screen.
In my case, I want to associate the district codes with the sales region:
Now the system knows that Region.Character01 is associated with User Defined Codes "District".
Step 3 - Form Customization
Now I need to add to the Sales Region form a combo box for the Character01 field.
As soon as I select Region.Character01 for the EpiBinding property, the system automatically filled in for me the EpiCombo properties.

And that's it. Now your users can choose from a pre-defined list of values for a user defined field.
For example, we have a client who organizes sales regions into sales districts. So, on the Sales Region Maintenance screen, we want the user to be able to select a district.
BEFORE

AFTER

You can customize the form, by adding a TextBox for SalesRegion.Character01 field, but it is better to have the user select from a range of choices.
Previously to accomplish this, you would have to add the sales districts into a user-defined table, and then add a combo box which populates from that table.
The easier way is to use something called User Defined Codes Maintenance.
Step 1 - Define User Codes
Located under System Management -> Utilities -> User Codes, open the "User Defined Codes Maintenance screen".
Create a Code Type, and then assign values (Code, and Code Description). In my case, I created a Code Type called "District", and added 4 codes, with descriptions "Northern District", "Southern District", etc. Each code also has a shorter Code ID.
Step 2 - Associate Field with User Code
Located under System Management -> Utilities -> Extended Properties, open the Extended Properties Maintenance screen.
In my case, I want to associate the district codes with the sales region:
- Selected "Region" DataSet Table ID
- Selected Fields tab, and selected the Character01 field from the tree view
- for the UD Code Type: field, chose "District" from combo box.
Now the system knows that Region.Character01 is associated with User Defined Codes "District".
Step 3 - Form Customization
Now I need to add to the Sales Region form a combo box for the Character01 field.
- Turn on Developer Mode (Main Menu -> Options -> Developer MOde)
- Open Sales Region
- Start Customization (Tools -> Customization)
- From Toolbox, add a EpiCombo control to the form
- Change the EpiBinding property to Region.Character01
As soon as I select Region.Character01 for the EpiBinding property, the system automatically filled in for me the EpiCombo properties.

And that's it. Now your users can choose from a pre-defined list of values for a user defined field.
Subscribe to:
Posts (Atom)
